Where to start my railroad empire? I suppose the best place to start is with a track plan. I knew approximately how much area I had available in the room. I drew it to scale, along with the furniture that was in the room and started moving things around to see how I could get the most usable space. I was able to carve out an area that would allow me a rectangle 41"x 86" with sufficient room to walk around it on three sides. I could also turn it and push it under the window when I was not using it to give myself room to continue using the room as an office. Once I knew the available room, I needed to decide how complex or simple I was going to make the layout. What did I want to do with it? I knew I wanted to watch trains run through the scenery that would become my small world, but what else did I want? I knew I wanted to take an active part in the operations of the trains. I wanted my railroad to have a reason for existence. That meant I needed industries, towns, railyards, etc.
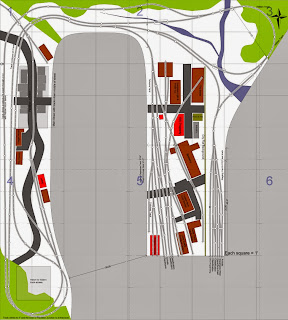
When you look at a blank rectangle 41"x86" it looks rather large. You can put down a lot of track in that space. However, as soon as you start adding scenery, buildings, roads, etc, it begins to shrink drastically. What was a blank sheet becomes more and more constricted as you try to add everything you want. Before long, you have no place for trains to run. I spent several weeks playing with different track design software packages to see which one fit my needs (in my case I ended up using a program called anyrail). I read model railroad blogs, sought ideas from track planning books, went on discussion boards and drew plans. Below is the design I finally ended up with--not the perfect layout, but something that would allow me to learn the ins and outs of model railroading for the immediate future. A different layout is already in the back of my head.

The first thing you will notice is that it is not rectangular. I found I could not fit as much industrail switching in the available space as I wanted. I remeasured the room, fiddled with the furniture again and realized I could add a triangular secion to the table and still walk around it for operations--although it does make it tight. The design allowed me to do the various things I wanted: I could watch trains go through the scenery, I could have a passenger train, I could have various industries to move rolling stock between different locations, and I could take an active role in the running of a railroad, regardless of how small it was. There appears to be a lot of empty space in the center of the layout, but as you will see, it gets eaten up pretty quickly when I started adding buildings for a small town. Additionally, you can only make a turn so tight if you want your locomotives to be able to maneuver around the track. One of the things that became apparent to me early on is that I could actually run two trains in opposite directions simultaneously by going with Digital Command and Control (DCC) from the beginning. Unfortunately, one thing I did not include is the ability to turn a train around. I had it in some earlier plans, but in the end, I gave it up for more industries and more switching.
Once I had a plan in place, it was time to decide how I was going to build this creation, but that is something for another posting.
 I can't believe I have let this blog go so long without updating. Now is a good time to start actively posting again though. Today I began the process of deconstructing my first layout. I was never happy with the track--poorly aligned and rushed. I had constant derails on many of the switches. In fact, it was so bad I hadn't run a train around it in almost a year. I have spent several months redesigning the layout and getting input from modelers I admire. When I put the Christmas layout up and started running a train around it, I got the impetus I needed to start being serious about the new layout. I discovered I had done a better job gluing the track down than I thought--I was unable to save more than a couple short pieces of track. None of the Atlas turnouts survived so I guess I won't be selling anything on eBay. I do hope I can reuse some of the rockwork, tunnel portals, trees, clump foliage, etc. when I start building again.


